- Joined
- Sep 9, 2012
- Messages
- 410
- Location
- Germany, Wiedemar
- First name
- Joachim
Machinery:
Zetor 2011, Zetor 3045, Zetor 5011, Zetor 7340 Economic
Set delivery start at cylinder 1 (front)
1. static method with capillary tube:
- Before installing the ESP, check whether the correct drive gear is installed on the pump:
- "3" = for 3 cylinder engines
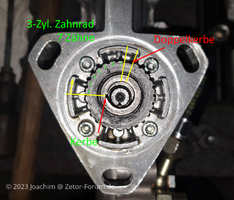
- "2", "4" or "2-4" = 2 and 4 cylinder engines
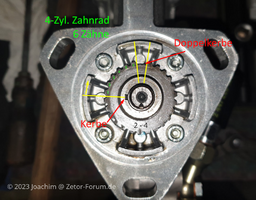
- "6" = for 6 cylinder engines
- Provide access and a clear view of the maintenance hatch on the clutch bell (left side).
- Dismantle the maintenance hatch cover (2 screws SW 10) and find/clean the mark (yellow arrow).
Dismantle - all nozzle assembly so that the engine can be turned more easily
- Dismantle the nozzle line from cylinder 1
- Screw the capillary tube onto pump element 1 (front).
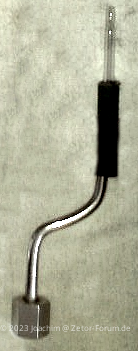
- Turn the engine clockwise (to the right) using the pulley nut until diesel comes out of the capillary tube without bubbles. (SW 46 socket and 2x extension + large ratchet)
- Motor in clockwise (green-white arrow) rotate until the OT mark (blue arrow) is found in the maintenance hatch (blue arrow)
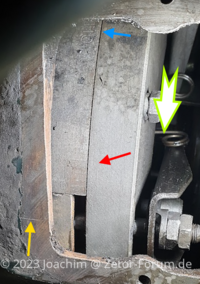
A little after the TDC marking you can find the markings for the start of delivery (red arrow, here 19°, 21°, 23° and graduation lines), whereby these are indicated as degrees before TDC. Please refer to the operating instructions for the Zetor tractor for the value that matches the engine!
Here again a little more clearly:
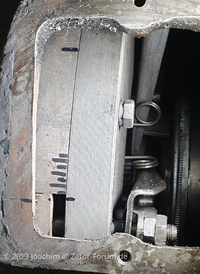
- When the mark is found, turn the motor back approx. 1/2 turn
- and now turn the motor SLOWLY again in the direction of rotation (to the right) and observe the capillary tube - as soon as the diesel in the glass tube moves/rises even slightly, stop immediately
- Now you can read on the flywheel, the current setting value in degrees before TDC.
In the previous photo, for example, that would be 25° before TDC and therefore a little too early for a Zetor 5211, for example, whose setpoint would be approx. 24° before TDC
- To now correct the value, you can pivot the ESP on the flange a little, whereby you pivot in the millimeter range and then try again (turn the engine forward again until approx. 30° before TDC and then continue to rotate and observe the capillary tube...)
- Example:
Assuming that the UR1 motor of a Zetor 5211 should be set to 24°vOTD start of delivery and in the first test it showed 25°vOTD (i.e. early start of delivery). In order to set it to 24°vTDC (i.e. later start of delivery), the injection pump must be turned on the flange approx. 1-2 mm away from the engine towards you.
If, for example, the sample had come out at 22°vTDC (too late start of delivery), the injection pump on the flange would have to be turned approx. 2 mm (reference value) towards the engine (to an earlier start of delivery) in order to get to around 24°vTDC.
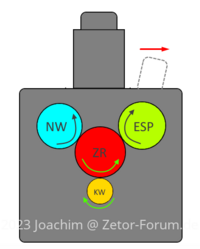
To clarify, the UR1 engine with the engine front cover open (viewed from the front)
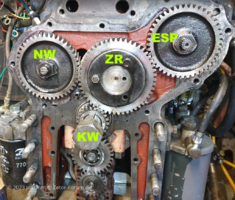
And again as schema UR1:
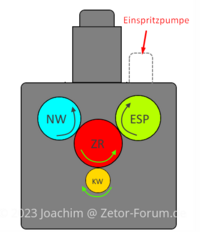
KW = crankshaft
ZR = intermediate gear
NW = camshaft
ESP = injection pump drive shaft
Adjust injection pump UR1 to an earlier start of delivery:
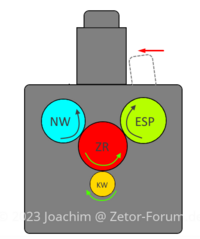
Adjust injection pump UR1 to a later start of delivery:
2. dynamic method with stroboscope:
- In Progress ...
Last edited:


